

Sourdough Rolls Recipe: Crusty, Tangy & Irresistible
There’s something truly special about the aroma of freshly baked bread wafting through your home. Now, imagine that heavenly scent combined with the tangy, complex flavor of sourdough. That’s exactly what you’ll get when you make these delightful sourdough rolls. Whether you’re a seasoned baker or just starting your sourdough journey, this recipe will guide you through creating soft, flavorful rolls that are perfect for any meal or occasion.
In this blog post, we’ll dive deep into the world of sourdough rolls. We’ll explore the ingredients, techniques, and tips you need to create these delicious treats in your own kitchen. So, grab your apron, and let’s get started on this tasty adventure!
What Makes Sourdough Rolls Special?
Before we jump into the recipe, let’s take a moment to appreciate what makes sourdough rolls so unique and delicious.
The Magic of Sourdough
Sourdough bread has been around for thousands of years, long before commercial yeast was available. It relies on a fermentation process using wild yeast and bacteria naturally present in flour and the environment. This fermentation not only leavens the bread but also produces the distinctive tangy flavor that sourdough is known for.
Health Benefits
Sourdough isn’t just delicious; it also offers some potential health benefits:
- Easier digestion: The fermentation process breaks down some of the gluten, making it easier for some people to digest.
- Lower glycemic index: Sourdough bread may have a lower glycemic index compared to regular bread, meaning it causes a slower rise in blood sugar.
- Increased nutrient availability: The fermentation process can make some nutrients more bioavailable.
Flavor and Texture
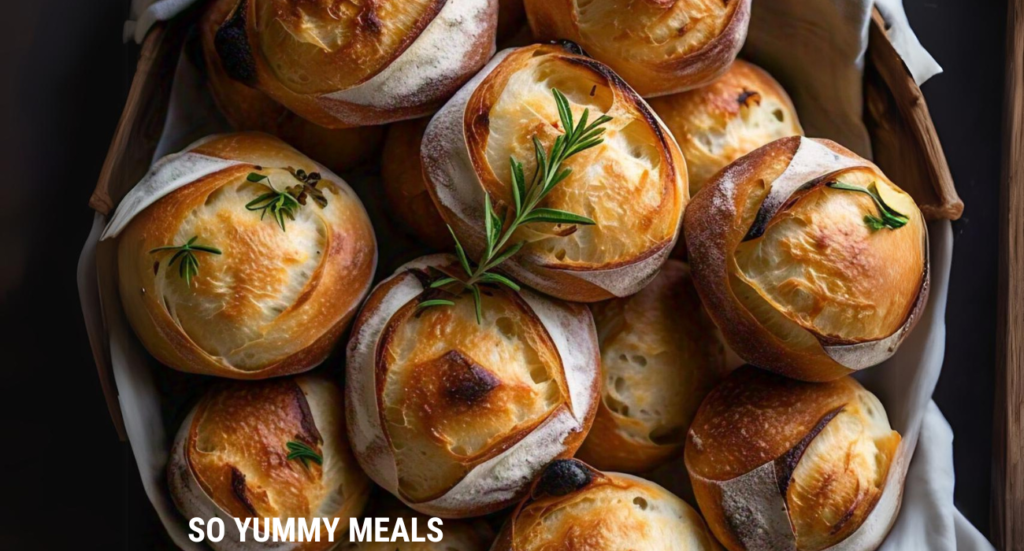
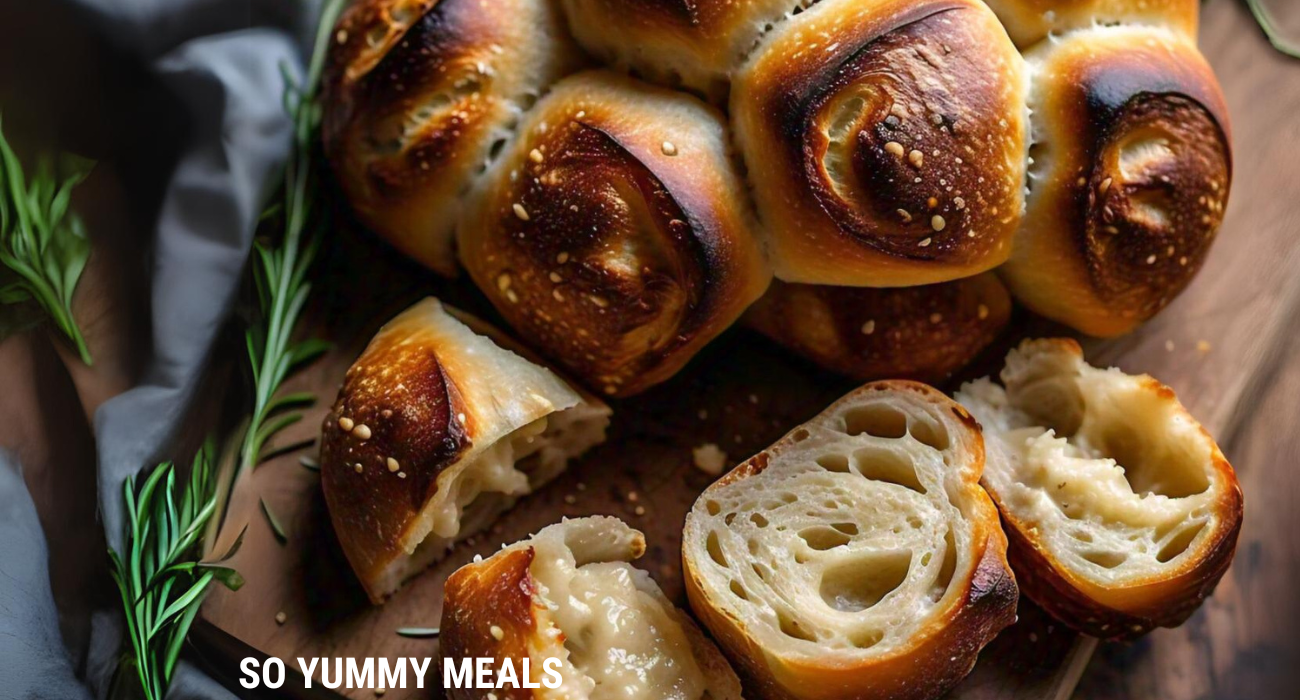
Sourdough rolls have a complex, slightly tangy flavor that adds depth to any meal. The crust is usually crispy, while the interior remains soft and chewy. This combination of textures makes sourdough rolls a versatile addition to your bread basket.
Ingredients for Sourdough Rolls
Equipment
- Bowl
- pitcher
Ingredients
- 500 g all-purpose flour
- 300 g active sourdough starter
- 250 ml lukewarm water
- 10 g salt
- 25 g unsalted butter, softened
Instructions
1. Mix the Dough
- In a large mixing bowl, combine the flour, active sourdough starter, and lukewarm water. Mix these ingredients until they come together to form a shaggy dough. Cover the bowl with a clean kitchen towel and let it rest for about 30 minutes. This step, known as autolyse, allows the flour to hydrate and begins gluten development.
2. Add Salt and Butter
- After the autolyse period, add the salt and softened butter to the dough. Knead the dough in the bowl, incorporating the salt and butter until they're evenly distributed. This should take about 5-10 minutes.
3. Bulk Fermentation
- Transfer the dough to a clean, lightly oiled bowl. Cover it with plastic wrap or a damp kitchen towel and let it ferment at room temperature (around 70°F / 21°C) for 4-6 hours. During this time, you'll need to perform a series of "stretch and folds" to develop the gluten structure:Every 30 minutes for the first 2 hours, gently stretch one side of the dough and fold it over itself.Rotate the bowl 90 degrees and repeat until you've gone all the way around (four folds total).After the first 2 hours, let the dough rest undisturbed for the remaining time.
4. Shape the Rolls
- Once the bulk fermentation is complete, it's time to shape your rolls:Turn the dough out onto a lightly floured surface.Divide the dough into 12 equal pieces (about 90g each).Shape each piece into a tight ball by pulling the edges into the center and pinching them together.Place the shaped rolls on a baking sheet lined with parchment paper, leaving some space between each roll.
5. Final Proof
- Cover the shaped rolls with a clean kitchen towel and let them proof for another 2-3 hours at room temperature. They should nearly double in size and feel puffy when gently poked.
6. Preheat and Prepare for Baking
- About 30 minutes before you're ready to bake, preheat your oven to 425°F (220°C). If you have a baking stone, place it in the oven now. Also, place an empty baking tray on the bottom rack of the oven – we'll use this to create steam.
7. Score and Bake
- When the rolls are ready to bake:Using a sharp knife or bread lame, score the top of each roll with a shallow cut.Quickly slide the baking sheet with the rolls into the oven.Pour a cup of hot water into the empty tray at the bottom of the oven to create steam, then quickly close the oven door.Bake for 20-25 minutes, or until the rolls are golden brown and sound hollow when tapped on the bottom.
8. Cool and Enjoy
- Remove the rolls from the oven and transfer them to a wire rack to cool for at least 20 minutes before serving. This cooling period is crucial as it allows the crumb structure to set.
Nutrition
Troubleshooting Common Issues
Even experienced bakers sometimes encounter challenges when making sourdough rolls. Here are some common issues and how to address them:
Rolls are Too Dense
If your rolls turn out dense or heavy, it could be due to a few reasons:
- Underproofed dough: Make sure you’re giving your dough enough time to rise, both during bulk fermentation and final proofing.
- Inactive starter: Ensure your starter is active and bubbly before using it in your recipe.
- Overmixing: Be gentle when handling the dough to avoid degassing it too much.
Rolls are Too Flat
Flat rolls might be a sign of:
- Overproofed dough: If the dough rises for too long, it can exhaust its rising power. Watch your dough closely and bake when it’s properly proofed.
- Weak gluten structure: Make sure you’re developing the gluten properly through kneading and stretch-and-folds.
Rolls are Too Pale
Pale rolls usually indicate:
- Not enough heat: Ensure your oven is properly preheated and maintain the temperature throughout baking.
- Lack of steam: Steam helps develop a golden crust. Make sure you’re adding water to create steam at the beginning of baking.
Variations and Additions
Once you’ve mastered the basic sourdough roll recipe, why not experiment with some variations? Here are a few ideas to inspire you:
Herb and Garlic Sourdough Rolls
Add 2 tablespoons of dried herbs (like rosemary, thyme, or oregano) and 2 cloves of minced garlic to the dough during the initial mixing stage.
Whole Wheat Sourdough Rolls
Replace half of the all-purpose flour with whole wheat flour for a nuttier flavor and added nutrition.
Cheese Sourdough Rolls
Fold in 1 cup of grated cheese (like cheddar or Parmesan) after the bulk fermentation, just before shaping the rolls.
Olive Sourdough Rolls
Add 1 cup of chopped olives to the dough during the initial mixing stage for a Mediterranean twist.
Storing and Reheating Sourdough Rolls
Sourdough rolls are best enjoyed fresh, but they can be stored for later enjoyment:
- Room temperature: Store in an airtight container for 2-3 days.
- Refrigerator: Keeps for up to a week in an airtight container.
- Freezer: Freeze for up to 3 months in a freezer-safe bag.
To reheat:
- Preheat your oven to 350°F (175°C).
- Lightly sprinkle the rolls with water.
- Wrap them in foil and heat for about 10 minutes, or until warmed through.
Pairing Suggestions
Sourdough rolls are versatile and pair well with a variety of dishes. Here are some serving suggestions:
- Serve alongside a hearty soup or stew for a comforting meal.
- Use as sandwich bread for a gourmet twist on your lunch.
- Serve with a cheese board and your favorite wines for an elegant appetizer.
- Toast and serve with butter and jam for a simple yet delicious breakfast.
Conclusion
Creating your own sourdough rolls at home is a rewarding experience that engages all your senses. From the tactile pleasure of kneading the dough to the mouthwatering aroma that fills your kitchen as they bake, making sourdough rolls is as much about the journey as it is about the destination.
Remember, sourdough baking is part science, part art. Don’t be discouraged if your first attempt isn’t perfect – each bake is an opportunity to learn and improve. With practice, you’ll develop a feel for the dough and be able to create consistently delicious sourdough rolls that will impress family and friends alike.
So why not give this sourdough rolls recipe a try? Your taste buds (and your nose) will thank you! Happy baking, and may your home be filled with the wonderful aroma of freshly baked sourdough rolls.


You May Also Like

Irresistible Strawberry Shortcake Cheesecake Rolls Recipe!

Fluffy Kodiak Pancakes in 10 Minutes – No Guilt!
